Creating a Sticky Modal in Figma: A Step-by-Step Guide
Modals are a common design pattern used to display important information or collect user input. They are typically triggered by a user action, such as clicking a button or link. Sticky modals are a type of modal that remains visible even when the user scrolls the page. This makes them ideal for displaying important information or instructions that the user needs to see at all times.
Modals are a common design pattern used to display important information or collect user input. They are typically triggered by a user action, such as clicking a button or link. Sticky modals are a type of modal that remains visible even when the user scrolls the page. This makes them ideal for displaying important information or instructions that the user needs to see at all times.
In this blog post, I’ll guide you through creating a sticky modal in Figma. I’ll walk you through every step — from setting up the modal’s structure to adding interactivity and styling. Whether you’re new to Figma or an experienced user, join me and discover how to craft sticky modals that elevate your design’s user experience. Stick around until the end for a special treat!
You can check out my design on Figma here.

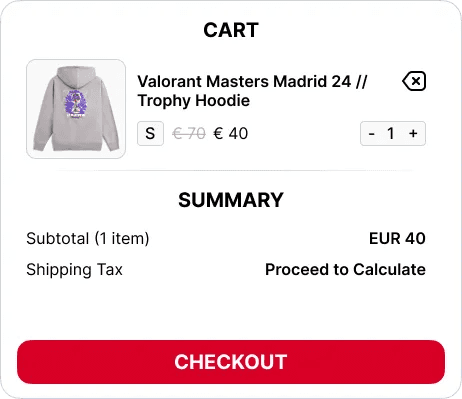
To begin, design your modal according to your needs and application. For instance, I designed a cart modal featuring item costs, subtotal, and a call-to-action button to proceed to the checkout page.

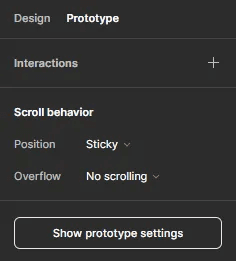
Select the modal frame and go to the Prototype tab on the top right.
Inside the Scroll behavior section, click on the Position dropdown.
The default is Scroll with Parent. Change this to Sticky (stop at top edge).
That’s it, you’re done.
You can now check the prototype and scroll beyond and have your modal stick to the top of the page.
Now for that treat I wrote about earlier. As you know, most applications do not require the modal to be sticky for the entirety of the length of the webpage. When another section of the page comes up, the sticky behavior also ends and the modal scrolls normally. We can replicate this behavior in Figma too. Here is how:
Select the modal frame and encapsulate it in another frame. You can do so by using the shortcut Ctrl + Alt + G.
This frame defines the boundaries for your modal. You can now extend it downwards to determine where the modal should stop sticking. Hold down the Ctrl button while extending the frame to prevent scaling its contents.
There you have it! Your modal now stops exactly where you want it to. This simple trick can significantly enhance the look and feel of your prototypes and effectively demonstrate the design’s functionality to your clients.
